Ad Code

Tuesday, February 28, 2017

Image Rendition with Cropping in AEM 6.2


"DAM Update Asset" is a default workflow which is triggered whenever any asset is uploaded into the DAM. This workflow helps to limit the size and the quality of the image displayed.

Why Image Renditions are required:
  1. Using different size images on the websites.
  2. Images for different devices or viewPort.
  3. Reducing the page load time.

Existing Workflow Scenario:

Steps to create Custom Rendition:
  • Go to the "DAM update asset" workflow
  • Select "Process Thumbnails" Step.
workflow.PNG
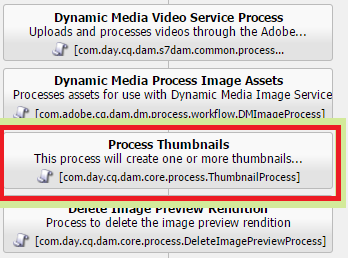
Fig-  Select and edit the Process Thumbnail Step

  • Add custom renditions as per your requirements
Fig - Add the Size of Rendition in Thumbnail Multifield

Cropping:

In the existing “DAM Update Asset” workflow image renditions are getting generated for different resolutions by resizing the images, but here cropping for the assets is not happening. However the need was to crop the image uniformly(top, bottom, left, right).
To achieve this, follow below steps:
  • Add Custom process(Rendition Image Cropping) step after “Process Thumbnail”.
  • Edit the Rendition Image Cropping process step.
  • Select the Process Tab.
  • Add the WorkFlow Process (Image Rendition Cropping Workflow Process).
custom.JPG
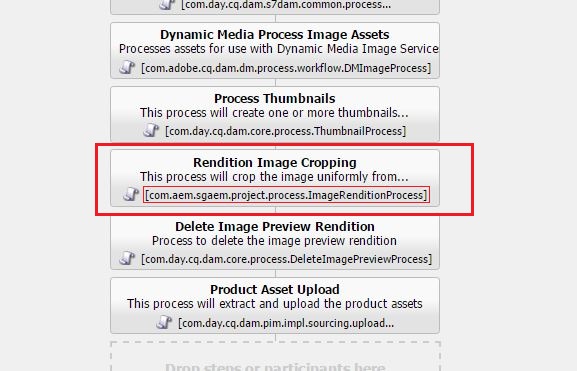
Fig- Add the New  Process Step and Select the
Custom Image Rendition Workflow process in the Process Tab

  • In the Process tab Configure the rendition size in Arguments field.
workflowImg.PNG
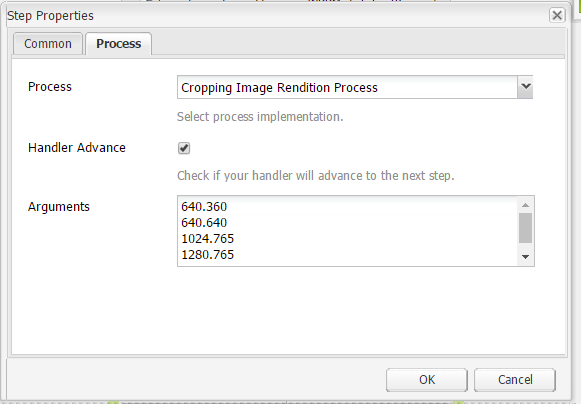
Fig- Configure The rendition size in the Arguments Section

Arguments: The custom workflow takes the arguments as input, fetch the original image size and crop the image from top, bottom, left and right.
Example: Let’s suppose the original size of image is "2200*1200" and the required image size is "640*360" .
  • Reduce the image from left and right equally ( 780px) to make the width as 640.
  • Reduce the image from top and bottom equally ( 420px) to make the height as 320.
example.jpg
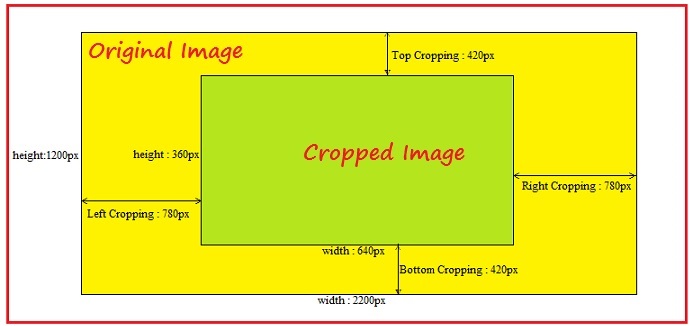
Fig- Sample Image showing the cropping concept

Check the below code for Image Rendition Process:

You can see all the renditions like this:

crx.PNG
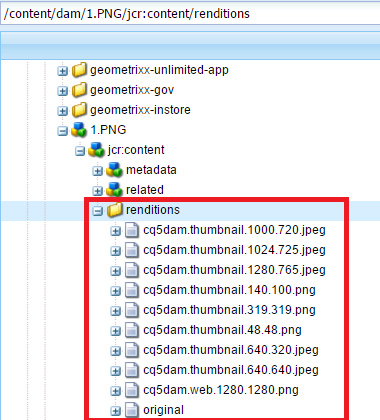
Fig - Renditions Created Under Dam Hierarchy

Demo Video:


You can install the package directly from here.
find the Git Repository

Mail us at sgaem.blog02@gmail.comg for any query or suggestion.

Hope it will help you guys !!👍
Thanks and Happy Learning 😊

Sunday, February 26, 2017

Granite UI Jquery Validations in AEM 6.2

As a developer, I want AEM components to be author friendly, So that  authors can fill the dialog with proper validations and check.

To achieve this  in touch UI dialog, Jquery Validation plugins are the most preferable and widely used.

Use Case: I was having a dialog in which i was enabling two fields Contact Us Message and Time only when author enters the mobile Number.
If author don’t enter anything in mobile no. field then both the fields will remain disabled.


How to achieve it:
1.Add a property validation in mobile,  contact us message and time widget. This property will be use as a selector in jquery.


validation.PNG
Fig- Adding the validation property in the widget

2.Now with the help of selector  ,the plugin is getting registered. Registering custom validators is done by calling the jQuery based $.validator.register method.
$.validator.register({
   selector: "form [data-validation='cq-dialog-mobileNo']",
   clear: function(el) {
       var mobileMessage = $("form [data-validation='cq-dialog-mobileMessage']");
       var time = $("form [data-validation='cq-dialog-time']");
       if (el.val() != "") {
           mobileMessage.attr('disabled', false);
           time.attr('disabled', false);
       } else {
           mobileMessage.attr('disabled', true);
           time.attr('disabled', true);
       }
   }
});


Through this validator, when author enters  mobile Number, it enables or disable rest of the fields.

Now there is also a problem that when content loaded, it is not showing the appropriate behaviour , because the above validation only works when there are some changes on mobileNumber field.

For Solving this issue, there is a need of calling clear() method when content is getting loaded.

/* call mobile tab validators on content loaded */

$(document).on("foundation-contentloaded", function(e) {

/* updateErrorUI is used to called clean method of validator */
   $("form [data-validation='cq-dialog-mobileNo']").updateErrorUI();
}


^E34DD7D6A308E21F2A71FB65C65958344AE58C0037F66A19C8^pimgpsh_fullsize_distr.png
Fig- Before enter the mobile number all field disabled

After entering the mobile number all field become enabled
enabled.PNG
Fig- After enter the mobile number all field become enable

In this example,one more tab E-Mail exists, in which email-id is disabled when email message is given.

You can find code for the same also while downloading the package.
Demo Package Install

If you have any query or suggestion then kindly comment or mail us at sgaem.blog02@gmail.com.

Hope it will help you guys !!👍
Thanks and Happy Learning 😊

Thursday, February 23, 2017

Custom Color Picker with Drop Down Menu in AEM 6.2

Hi All,

Dropdown widget having loads of color options which can be selected… it was really a mess to remember those names.
As a developer, I was wondering why author just can’t select the name and configure it…..
Color-picker is definitely not a solution as we wanted to show the restricted number of colors…


dialog1.PNG
Fig- Drop-down with color name options

Finally, we got a better solution for this and gave the background color for drop-down menu option and it resolved the complexity…


Let's see how to achieve this:

1.Add a class "bgColor" on highlighted node of drop-down.

Capture.PNG
Fig-  Add the class "bgColor" on selected node

2. Create node /apps/aem-learning/components/content/colorPicker/colorPickerClientLib of type cq:ClientLibraryFolder and add a String property categories with value cq.authoring.dialog.


3.Create file (nt:file) /apps/aem-learning/components/content/colorPicker/colorPickerClientLib/js.txt  and add the following js files:
  • drop-down.js
  • colorPicker.js
drop-down.js
 $(document).on("click", ".bgColor ul", function(e) {  
   touchDialog.colorDropDown();  
 });  
 $(document).on("foundation-contentloaded", function(e) {  
   touchDialog.colorDropDown();  
 });  

colorPicker.js
 var touchDialog = {  
   colorDropDown : function() {  
     var dropdown = $('.bgColor ul');  
     var button = $('.bgColor button');  
     var childlist = dropdown.children();  
     if (childlist.length > 1) {  
       for (i = 0; i < childlist.length; i++) {  
         var attr = childlist[i].getAttribute("data-value");  
         if (attr) {   
           $(childlist[i]).css("background-color", attr);  
           $(childlist[i]).css("border-style", "solid");  
         }  
         if($(childlist[i]).hasClass("is-highlighted")&& attr){  
           $(button).css("background-color", attr);  
         }  
         if(!attr)  
           $(button).css("background-color", "transparent");  
       }  
     }  
   }  
 };  

dialog-with-color.PNG
Fig- Drop-down with background-color on Values


If you have any query or suggestion then kindly comment or mail us at sgaem.blog02@gmail.com.

Hope it will help you guys !!👍
Thanks and Happy Learning 😊

Tuesday, February 21, 2017

Override/Overlay Dam Asset Metadata in AEM 6.2

Use Case: Recently I have gone through a scenario. In which i want to change the dam asset properties and want to add a new widget as well.

This image depicts the default touch ui dialog available for dam asset properties. Now I want to change/add a rootPath for tags so that i can select tags from specific hierarchy only.

This Default dialog comes from “/libs/dam/content/schemaeditors/forms/default”. But According  to the AEM Best Practice we never do any change in /libs hierarchy.

sample.JPG
Fig: DAM Asset Property Dialog

Now I thought about below concepts:
  • I have tried to do that using Resource Merger, but it didn’t work.
  • After that I have tried same using Overlay the complete hierarchy in /apps but it also didn’t work.

Solution:
In AEM 6.2 the correct way to do this is through  "metadata schema".To add/change the properties for a dam asset properties, use a custom metadata schema form or modify an existing form. So I decided to go for modifying an existing form.

Below Steps we need to follow:
Step 1: Go to Projects.html  .
Step 2: Click on Adobe Experience Manager
Step 3: Go to Tools and click on Assets.
Step 4: Click on Metadata Schema
Step 5:  Select Default and go to edit.
Step 6: In this Edit Form, you can see all the fields available in metadata dialog.

overlay.PNG

Fig: Modifying Existing Form
Step 7: In the url query parameter , you can see "formpath=/conf/global/settings/dam/adminui-extension/metadataschema"

Now just change some title in dialog suppose test title and check it in the same path.

crx.PNG
Fig: Add/Change Properties inConf Hierarchy in CRX

Now i just add the property rootPath in my tags node and when i go for any image /asset metadata.
I am able to see the title to Test Title.

dialog.PNG
Fig: Updated Dialog After Modification

And when i  click on tags ,I can find tags  available under /etc/tags/forum.

Capture.PNG
Fig: Updated the root path for Tag widget

So This was the solution of above problem.

If you have any query or suggestion then kindly comment or mail us at sgaem.blog02@gmail.com.

Hope it will help you guys !!👍
Thanks and Happy Learning 😊

.