Ad Code

Friday, January 11, 2019

Show/Hide Tabs and Fields based on Drop Down Selection Using Granite Widgets in AEM

Hello Everyone,

While creating components, we come across a lot of situations where we need to show

and hide tabs based on drop-down selection, show and hide fields on the basis of
drop-down, radio-button and checkbox.

So in this blog, I will talk about the two situations in detail with demo videos
and sample package.
1. Show and Hide tabs based on Drop Down selection
2. Show and Hide fields based on Drop Down selection

Show and Hide Tabs based on Drop Down Selection
Let’s take an example, in which There are two options “Image” and “Video” in the drop down in the first tab and if author choose image, the tab 2 "Image" shows up and if author choose video,tab 3 "Video" shows up.

Step 1:Make a drop down field in the first tab and make second and third tab
as per your requirement.
Step 2: The drop down node must have these properties:
Name
Type
Value
class
string
cq-dialog-tab-showhide
cq-dialog-tab-showhide-target
string
.list-option-tab-showhide-target

Fig -1 Add Properties in the DropDown Field Widget
Step 3: The value property of options is very important as in my component, the value property is image and video for both options.
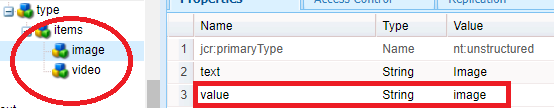
Fig -2
Step 4: Now to open Tab 2 on the selection of “Image” Option from the drop -down,
create a node layoutConfig” as shown below  in the tab and configure a property class having value “hide list-option-tab-showhide-target image”.Here “image” in class name should match with the value of option selected in tab1. For video tab the value will be “hide list-option-tab-showhide-target video”.
Fig -3 Add layoutConfig Node to Show/Hide Tabs 

Step 4 : Create a clientlib having “categories” as “cq.authoring.dialog” and add a js file in it.

That’s all you are supposed to do and your component will start working.This is not AEM OOTB feature, so to support this functionality we are using custom JS.

Demonstration Video on Show/Hide Tabs Based on Drop Down Selection:


Show and Hide Fields based on Drop Down Selection

Let’s take an example, in which There are two options “Title” and “URL” in the drop down, if author choose “title” show “Title” else show “URL” widget for adding path.

Step 1: Make a drop down having two options:Title and URL having value “title” and “url”.
Step 2:The drop down node must have these properties:
Name
Type
Value
class
string
cq-dialog-dropdown-showhide
cq-dialog-dropdown-showhide-target
string
.title-url-hide-show

Fig -4 Add Properties in the DropDown Field Widget
The value of “cq-dialog-dropdown-showhide-target” can be changed as per your need. Right now it is “.title-url-hide-show”. You can change it to” .text-image-hide-show” if you are hiding and showing text and image.Try to use good naming convention.

Step 3: Now to show and hide fields based on title, follow the steps:
  • Create a node name “title” of type "nt:unstructured" having "sling:resourceType" as "granite/ui/components/foundation/container" having the following properties:
Name
Type
Value
showhidetargetvalue
string
title
class
string
hide title-url-hide-show

Note: showhidetargetvalue” depends on the “value” of options in the drop down. For URL Option,  the “showhidetargetvalue” would be “url”.

Note: the “class” value will be same as defined in the property of “cq-dialog-dropdown-showhide-target” of the drop-down.just add “hide” before that value
  • Create “items”(nt:unstructured) as a child node of “title” node.
  • Create “well” (nt:unstructured) as a child node of items having sling:resourceType as “granite/ui/components/foundation/container”
  • Create a node “layout” (nt:unstructured) under “well” node having sling:resourceType as granite/ui/components/foundation/layouts/well.
  • Create a “items” (nt:unstructured) node parallel to layout of type nt:unstructured.
  • Add as many widgets under “items” node you want to show on the selection of title option.
Step 4: Repeat Step 3 for URL option as well.
Fig-5
And that’s all you are supposed to do.There is no need to write any custom JS as AEM has this as an OOTB functionality.

Demonstration Video on Show/Hide Fields Based on Drop Down Selection:


INSTALL DEMO PACKAGE

If you have any query or suggestion then kindly comment or mail us at sgaem.blog02@gmail.com


Hope it will help you guys !!
Thanks and Happy Learning.

Saturday, December 29, 2018

Implement 301 and 302 Redirect in AEM


Hello Everyone,

A website redirect will take one website URL and point it to another. When anyone
types in or clicks on that original URL they’ll be taken to the new page or website.

There are few different types of redirects.
301 Redirect:A 301 redirect is a permanent redirect from one URL to another. 301
redirects send site visitors and search engines to a different URL than the one they
originally typed into their browser or selected from a search engine results page.
The big reasons marketers might set up a 301 redirect are:
  • To rebrand or rename a website with a different URL.
  • To direct traffic to a website from other URLs owned by the same organization.
Note:- In case of 301 redirect browser cache the mapping of new URL with old URL.

302 Redirect:A 302 status code means Found, or more commonly referred to as “temporarily moved.” This redirect doesn’t carry or pass the link value to the new location. What it does do is get the user to an appropriate location for you so that you aren’t showing them a broken link, a 404 page not found, or an error page.
Note:- In case of 302 redirect browser does not maintain any mapping or cache. So, server receives hit for both the URLs.
In AEM, OOTB redirect URLs do 302 Redirect.Redirect URL will only work in disabled and publish mode but not in edit mode.
Fig-1 Redirect Widget in Page Properties Dialog
So How to do 301/302 Redirect in AEM?
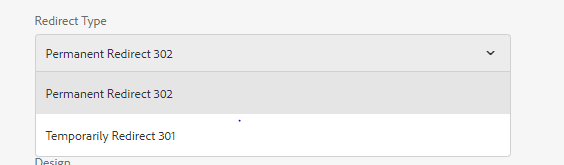
Add a custom widget as drop down to select 301 and 301 redirect and value must be 301 and 302 only.
Fig-2 Redirect Type Option in Page Properties

Let’s start with AEM 6.2/AEM 6.3 with 301/302 Redirect

The logic of redirection is written in /libs/foundation/components/page/page.jsp file so need to seperate the redirection logic in one another jsp file may be “redirect.jsp” but logic in this jsp only do 302 redirect so let’s add logic for 301 redirect.and include that jsp in header.html. 
The implementation of 301 and 302 Redirection is exactly same in AEM 6.2 and AEM 6.3

redirect.jsp having the logic for 301 and 302 redirection:

Demonstration Video on 301 and 302 Redirection in AEM 6.2


AEM 6.4 with 301/302 Redirect:
In AEM 6.4, AEM has provided a feature of redirecting a page by default.It means no need to write
any redirect.jsp for 302 Redirection.


So how 302 Redirect is working in AEM 6.4?
My observation: I created a page component without any inheritance and created a
page configured a redirect path in it.
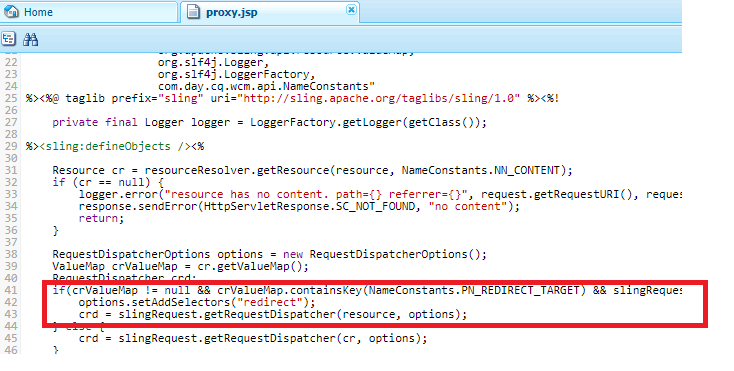
While rendering a page this jsp "/libs/cq/Page/Page.jsp" gets called. This jsp
includes proxy.jsp and that proxy.jsp is calling a servlet com.day.cq.wcm.foundation.impl.PageRedirectServlet.java with selector "redirect".
Fig-3 : Call PageRedirectServlet from proxy.jsp

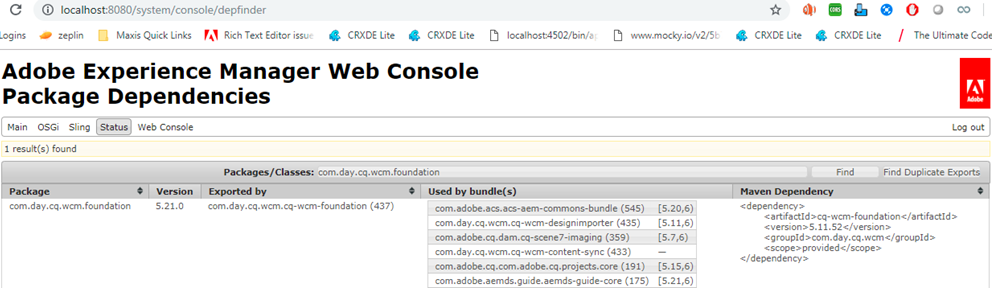
com.day.cq.wcm.foundation.impl.PageRedirectServlet.java class exists in the bundle shown below.
Fig-4: Bundle that has the class PageRedirectServlet.java
Now the question come how to configure 301 in AEM 6.4??
To achieve 301 redirect,
  • Overlay /libs/cq/Page hierarchy and make a servlet with a different selector and make an entry of that selector in proxy.jsp.So that always your servlet will get called (in which the logic for 301 and 302 redirection is written ) in place of OOTB servlet.
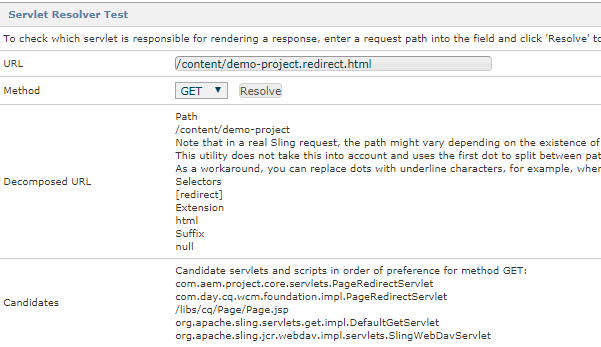
  • Make your own servlet class with the same selector(redirect) with 301 redirect logic in it and make the service ranking of this servlet higher.OOTB Servlet is not using any service ranking, so you can create servlet using service ranking and then always your servlet will get called.
Fig-5: Servlet Resolver Console that shows the scripts running for redirection as per preference
Custom PageRedirectServlet
Demonstration Video on 301 and 302 Redirection in AEM 6.4

If you have any query or suggestion then kindly comment or mail us at

sgaem.blog02@gmail.com
Hope it will help you guys !!
Thanks and Happy Learning.
Sunday, December 23, 2018

Personalization using ContextHub in AEM 6.4: Part-2

Hello Everyone,
I am sure you have gone through my previous blog on Personalization using ContextHub
in AEM 6.4 Part-1. Now in this blog we will discuss some more features of ContextHub in
Personalization.
Boost Factor

There is a boost value associated with each contexthub segment.If there are more
than one segments gets resolved at the same time then which one should take
higher priority.So boost factor decides which segment should resolved and show content.
A higher number indicates that the segment will be selected in preference to a segment with
a lower number.
  • Minimum Value:0
  • Maximum Value:1000000
Segment Engine

Segment Engine allows to build conditions that gets resolved into a Boolean values.List of Components in the ContextHub Segmentation Group:
  • Comparison:Property-Value:Compares a property of a store to a defined value.
  • Comparison: Property-Script Reference:Sometimes to create conditions using Comparison: Property value is not possible.
Example: Let’s suppose you are storing the date when user has visited a particular page, and you want to personalize the content only till 4 days of his/her visit so you can not create such condition using OOTB components.You need to write one script to do this and if script returns true the segment gets resolve.

Defining a Script to Reference:

  • Add file to contexthub.segment-engine.scripts clientlib.
  • Implement a function that returns a value. For example:
(function() {
   'use strict';
   var testScript = function(val1, val2) {
       /* let the SegmentEngine know when script should be re-run */
       this.dependOn(ContextHub.SegmentEngine.Property('profile/age'));
     this.dependOn(ContextHub.SegmentEngine.Property('profile/givenName'));

       var name = ContextHub.get('profile/givenName');
       var age = ContextHub.get('profile/age');

       /* return result */
       return name === 'Joe' && age === 123 && val1 === 11 && val2 === 22;
   };

   /* register function */
   ContextHub.SegmentEngine.ScriptManager.register('test-script', testScript);
})();
  • Register the script with ContextHub.SegmentEngine.ScriptManager.register.
  • If the script depends on additional properties, the script should call this.dependOn(). For example if the script depends on profile/age.

Referencing a Script:

  • Create ContextHub segment.
  • Add Script Reference component in the desired place of the segment.
  • Open the edit dialog of the Script Reference component. If properly configured, the script should be available in the Script name drop-down.

Fig 1: Script Reference Component
You can find all the scripts loaded here:
/etc/cloudsettings.kernel.js/libs/settings/cloudsettings/legacy/contexthub
  • Comparison:Segment Reference : In this component you can make conditions based on referring the segments.
Let's take an example, you have already created two segments:
    • The Gender is Female.
    • The age is above 30.
Now you can make a new segment that checks both conditions gender is female and age is above 30, no need to create it using Comparison:property-Value, you can make it using Segment Reference.

Fig 2: Segment Reference Component
  • Container AND and Container OR:Using the AND and OR container components, you can construct complex segments in AEM. When doing this, it helps to be aware of a few basic points:
    • The top level of the definition is always the AND container that is initially created. This cannot be changed, but does not have an effect on the rest of your segment definition.
    • Ensure that the nesting of your container makes sense. The containers can be viewed as the brackets of your Boolean expression.
The following example is used to select visitors who are considered in our prime age group:
Male and between the ages of 30 and 59
OR
Female and between the ages of 30 and 59

You start by placing an OR container component within the default AND container. Within the OR container, you add two AND containers and within both of these you can add the property or reference components.
  • Comparison:Property-Property:In this component, you can compare the value of two properties of different stores or may be same stores.
  • Comparison:Property-Segment Reference:Comparison:Compares a property of a store to another referenced segment.
  • Comparison:Property-Script Reference: Compares a property of a store to the results of a script.
Note:I really don’t know the business use case of three components (Comparison: Property-Property,Comparison:Property-Script Reference,Comparison:Property-Segment Reference).So i just mentioned the definition of components but use case can’t explain.

How to create Offers in AEM using Personalization
In the previous blog, we talk about limitations of Personalization in Contexthub in AEM using component targeting  that we can’t change the components for different audiences but using offers this can be achieved also.
  • Go to Offers console from Personalization. 
  • Go to Project and click on Create Folder and Offers.
  • Choose Offer Page and Click on Next.
  • Now add the Offer Title and click on Create.
Fig 3: Console for Offer Creation
  • Now open the offer page,you will see an open parsys.You can drop n number of components in the parsys and create an offer page.
  • Now go to the page,select targeting mode then choose brand and activities,select the component and target it.
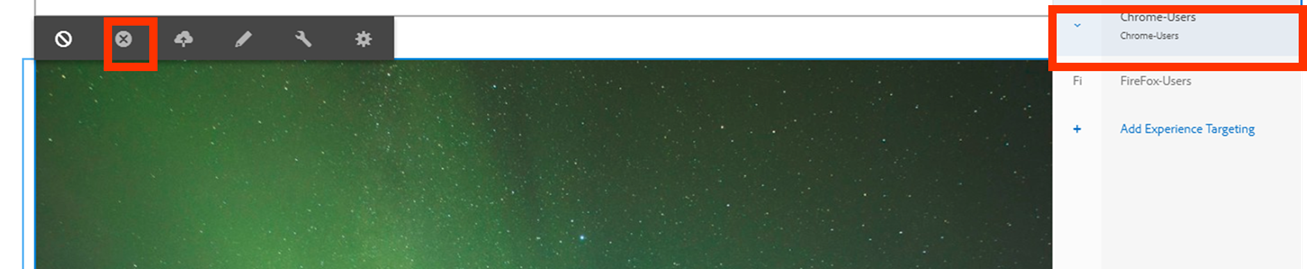
  • When you choose a particular segment,there is one icon saying “remove offer from Activity” click on it then you will see a placeholder like "Add Offers".

Fig 4: "Remove offer from Activity" option in the component
  • Then click on icon “choose from offer library” and select the particular offer for that particular segment.
Fig 5: "Add offer" option in the component
This is how you can select offers based on segments and personalized the content.
Demonstartion Video on Creating an offers and Boost Factor:


What are the changes in AEM 6.4 in contextHub

  • AEM 6.4 is using /conf//settings/wcm/segments to store segments
  • AEM 6.4 is using  /conf//settings/cloudsettings//contexthub for configurations.
  • sample config moved from /etc/settings/cloudsettings/default/contexthub to /libs/settings/cloudsettings/legacy/contexthub  
  • sample segments moved from /etc/segmentation/contexthub to /conf/we-retail/settings/wcm/segments.
  • segment generation and resolving performance improvements (/path/to/segments.seg.js)

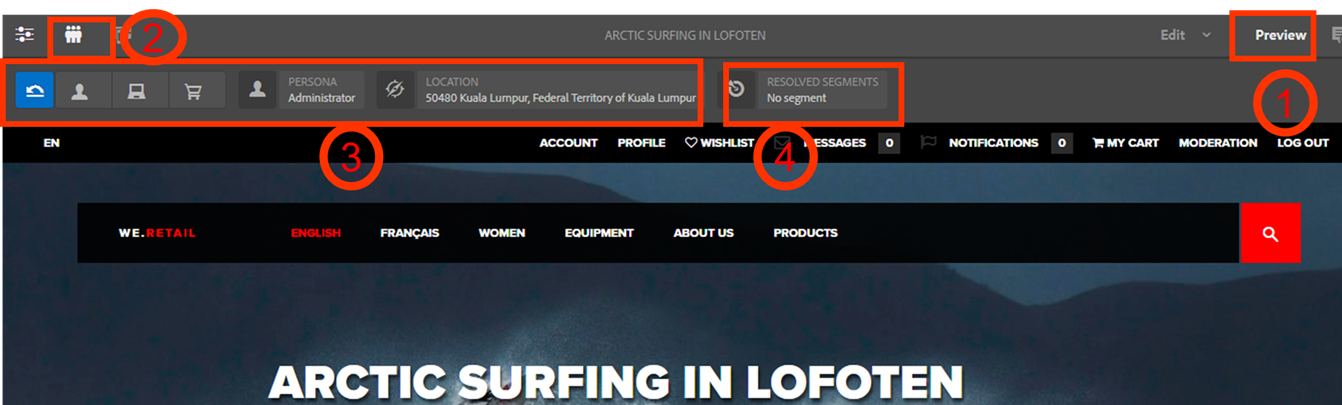
Testing the Application of a segment in contextHub

  • Preview a Page.
  • Click the ContextHub icon to reveal the ContextHub toolbar.
  • Select a persona that matches the segment you created.
  • The ContextHub will resolve the applicable segments for the selected persona.
Fig 6: Steps for Testing the Segments in ContextHub
Once the segment has been defined, potential results can be tested with the help of the
ContextHub.

Demonstartion Video on Segment Engine and Testing of Segments in ContextHub:
So this is all about OOTB functionalities of Personalization in AEM.In the upcoming blogs, we will talk about more about custom stores and modules.So stay tuned with more upcoming blogs of personalization.

If you have any query or suggestion then kindly comment or mail us at
sgaem.blog02@gmail.com
Hope it will help you guys !!
Thanks and Happy Learning.